> ## Documentation Index
> Fetch the complete documentation index at: https://docs.rork.com/llms.txt
> Use this file to discover all available pages before exploring further.

# Design mode, Plan mode, and building

> Rork can design your app before it writes code, write a plan before it changes files, or build straight away. This page explains the three paths, where the switches are, and what each one costs.

export const CtaBanner = () => <div style={{
  display: "flex",
  alignItems: "center",
  justifyContent: "space-between",
  gap: "24px",
  flexWrap: "wrap",
  margin: "40px 0 8px",
  padding: "22px 28px",
  borderRadius: "16px",
  background: "linear-gradient(135deg,rgba(249,115,22,0.10),rgba(255,255,255,0.03),rgba(249,115,22,0.06))",
  border: "1px solid rgba(255,255,255,0.08)"
}}>
    <div>
      <div style={{
  fontSize: "19px",
  fontWeight: 700,
  color: "#fff",
  letterSpacing: "-0.3px",
  lineHeight: 1.3
}}>
        Build your app with Rork today.
      </div>
      <div style={{
  fontSize: "14px",
  color: "rgba(255,255,255,0.6)",
  marginTop: "4px",
  lineHeight: 1.5
}}>
        Ship iOS, Android, and web apps by chatting with AI.
      </div>
    </div>
    <a href="https://rork.com?utm_source=docs&amp;utm_medium=referral&amp;utm_campaign=docs-cta&amp;utm_content=cta-banner" onClick={tagCtaLink} style={{
  flexShrink: 0,
  display: "inline-block",
  padding: "10px 24px",
  background: "linear-gradient(135deg,#fff,#f0f0f0)",
  color: "#000",
  fontSize: "14px",
  fontWeight: 600,
  borderRadius: "100px",
  textDecoration: "none",
  whiteSpace: "nowrap"
}}>
      Try Rork for Free
    </a>
  </div>;

Rork has three ways to answer a message. It can **design** the screens first, **plan** the work first, or **build** the change straight away. Every path ends in the same place, a working app, but they cost different amounts and give you different moments to change your mind.

| Path            | Rork produces                                | Use it when                                      |
| --------------- | -------------------------------------------- | ------------------------------------------------ |
| **Design mode** | Pictures of the screens, nothing built yet   | You start a new app and care how it looks        |
| **Plan mode**   | A written plan of the work, no files changed | The change is large or touches many screens      |
| **Build**       | Working code in the preview                  | You know what you want and it is a normal change |

## Where the switches are

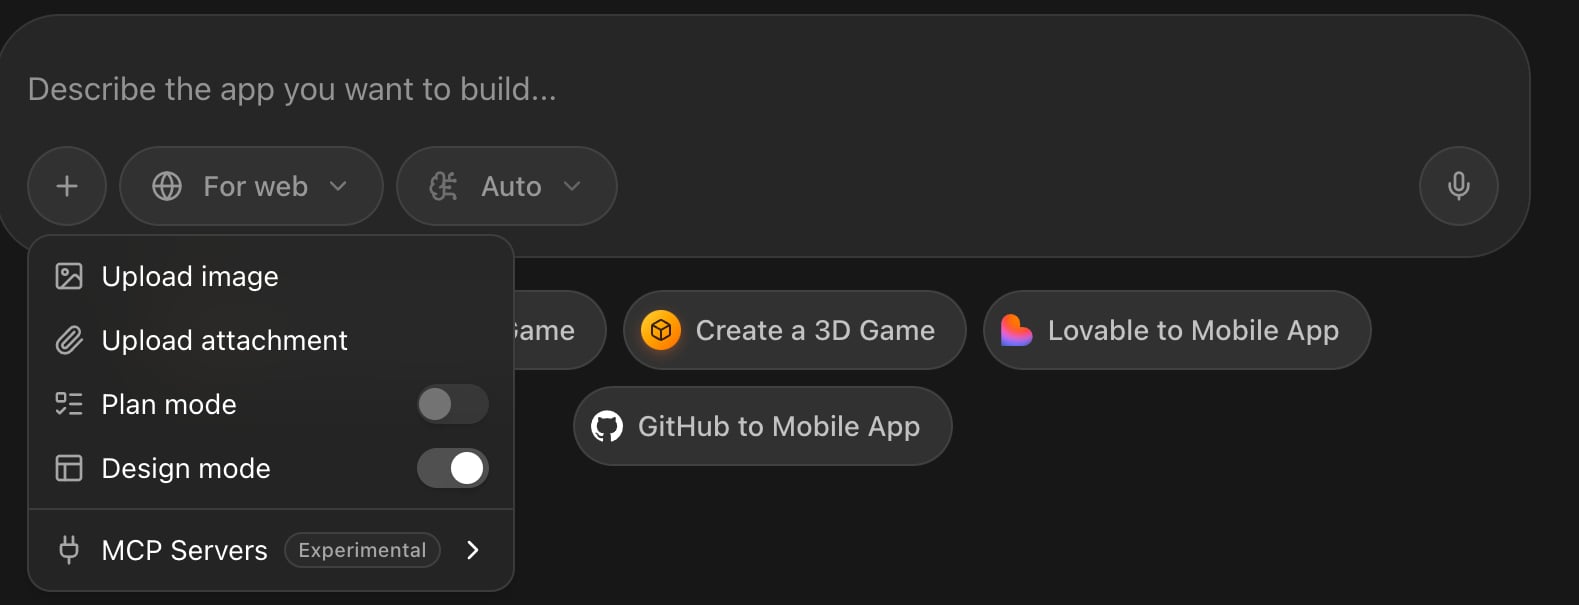
On [rork.com](https://rork.com), open the **+** button under the prompt box. **Plan mode** and **Design mode** sit in that menu.

<Frame caption="The + menu on the prompt box holds Plan mode and Design mode.">
  <img src="https://mintcdn.com/rork/DvKNYT4s6kJH2rkl/images/modes/plus-menu.png?fit=max&auto=format&n=DvKNYT4s6kJH2rkl&q=85&s=c66c09996d492bc964e9462296a3c5fd" alt="The Rork prompt box with the plus menu open, showing Upload image, Upload attachment, Plan mode, and Design mode switches" width="1579" height="605" data-path="images/modes/plus-menu.png" />
</Frame>

The two switches are exclusive. Turning one on turns the other off.
<Note>
  The **Design mode** switch belongs to paid plans. On the free plan Rork still designs your app first, and pressing **Build** on the design asks you to pick a plan. The paywall says it plainly: free credits cover design, and building your app needs a plan. See [Plans & Subscriptions](/introduction/subscriptions).
</Note>

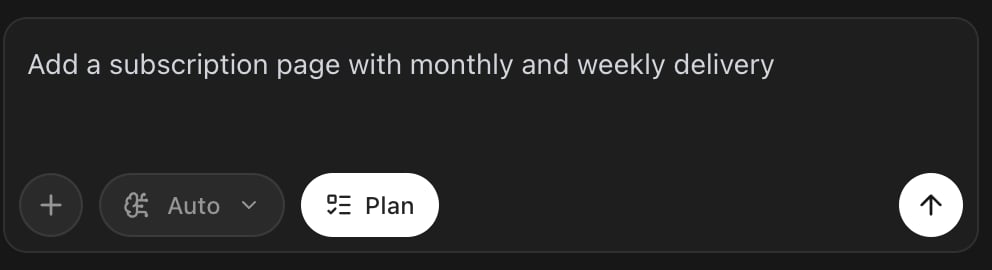
Inside a project the composer has a **Plan** button instead. Its tooltip reads **Enable plan mode**. There is no Design switch inside a project, because Design mode belongs to the start of an app.

<Frame caption="The Plan button in a project. It is on here, so the next message produces a plan instead of code.">
  <img src="https://mintcdn.com/rork/DvKNYT4s6kJH2rkl/images/modes/plan-toggle.png?fit=max&auto=format&n=DvKNYT4s6kJH2rkl&q=85&s=5636add672106262f596d1bc534d16c5" alt="The Rork chat input with a prompt typed and the Plan button switched on" width="992" height="270" data-path="images/modes/plan-toggle.png" />
</Frame>

## Design mode

Design mode is the cheap way to decide how your app looks. Rork draws the screens, and nothing is built until you approve them.
<Steps>
  <Step title="Answer a few questions about the look">
    Rork asks a few short questions before it draws anything, usually one to three, sometimes a follow-up. Most answers come with a small preview of the style they stand for, so you pick a look rather than describe one. Every question also offers **Surprise me** and an **Other...** box for your own words. Press **Submit** when you are done.
  </Step>

  <Step title="Read the proposal">
    Rork proposes three or four screens and opens them in the **Design** tab. This is a picture of your app, not a running app.
  </Step>

  <Step title="Change your mind, for very little">
    Ask for a different screen, a different palette, or a different layout in chat. Changing a design costs far less than rebuilding a working app.
  </Step>

  <Step title="Press Build">
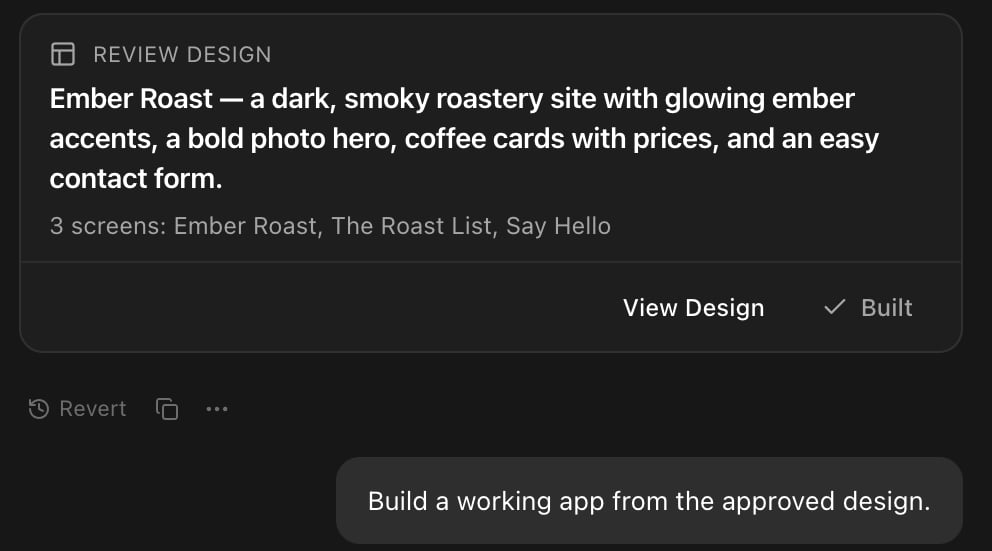
    The **Review Design** card sits at the bottom of the chat. **View Design** reopens the screens and **Build** turns them into a working app.

    <Frame caption="The Review Design card. After the build it keeps View Design and marks itself Built.">
      <img src="https://mintcdn.com/rork/DvKNYT4s6kJH2rkl/images/modes/review-design.png?fit=max&auto=format&n=DvKNYT4s6kJH2rkl&q=85&s=85d652da901cf695b34bb15671a6b94c" alt="A Review Design card in the Rork chat listing three screens, with View Design and Built shown below it" width="992" height="551" data-path="images/modes/review-design.png" />
    </Frame>
  </Step>
</Steps>

**Build** sends one message for you: `Build a working app from the approved design.` Rork then writes the app and saves the design decisions to `.rork/DESIGN.md`, so later messages keep the same look. You can read that file in **More → Code**.

After the build, the proposal does not disappear. Find it again in **More → Design**.

<Tip>
  Write the look into your first prompt and Rork has less to ask. "A dark, smoky roastery site with big photo cards" answers most of the questions before Rork asks them.
</Tip>

## Plan mode

Plan mode is for the changes that are too big to hand over blind. Rork writes down what it intends to do, and it changes no files until you agree.

Turn **Plan** on in the composer, then send your message. Rork writes a plan file under `.rork/plans/` and shows a **Review Plan** card in chat:

* **View Plan** opens the plan in the **Plan** tab.
* **Build** starts the work. It sends `Build the plan.` and turns Plan mode off.

Rork can also ask for Plan mode itself when a request looks large. The card reads **Switch to Plan Mode?** with **Approve** and **Decline**. Declining keeps it building the normal way.

Plan mode has no separate price. It uses the same build credits as any other message.

## Building

Building is the default. Neither switch is on, you describe the change, and Rork edits the code.

While it works, the chat shows what it does: **Explored 7 files**, **Made 9 actions**, **Running checks**, **Building app**. Each finished message lists the files it touched, and a preview of the result.

Rork stops and asks when a step needs you: a key it does not have, a question with several sensible answers, a design decision it cannot guess. Those arrive as cards in the chat with buttons, not as walls of text.

## Choose the AI model

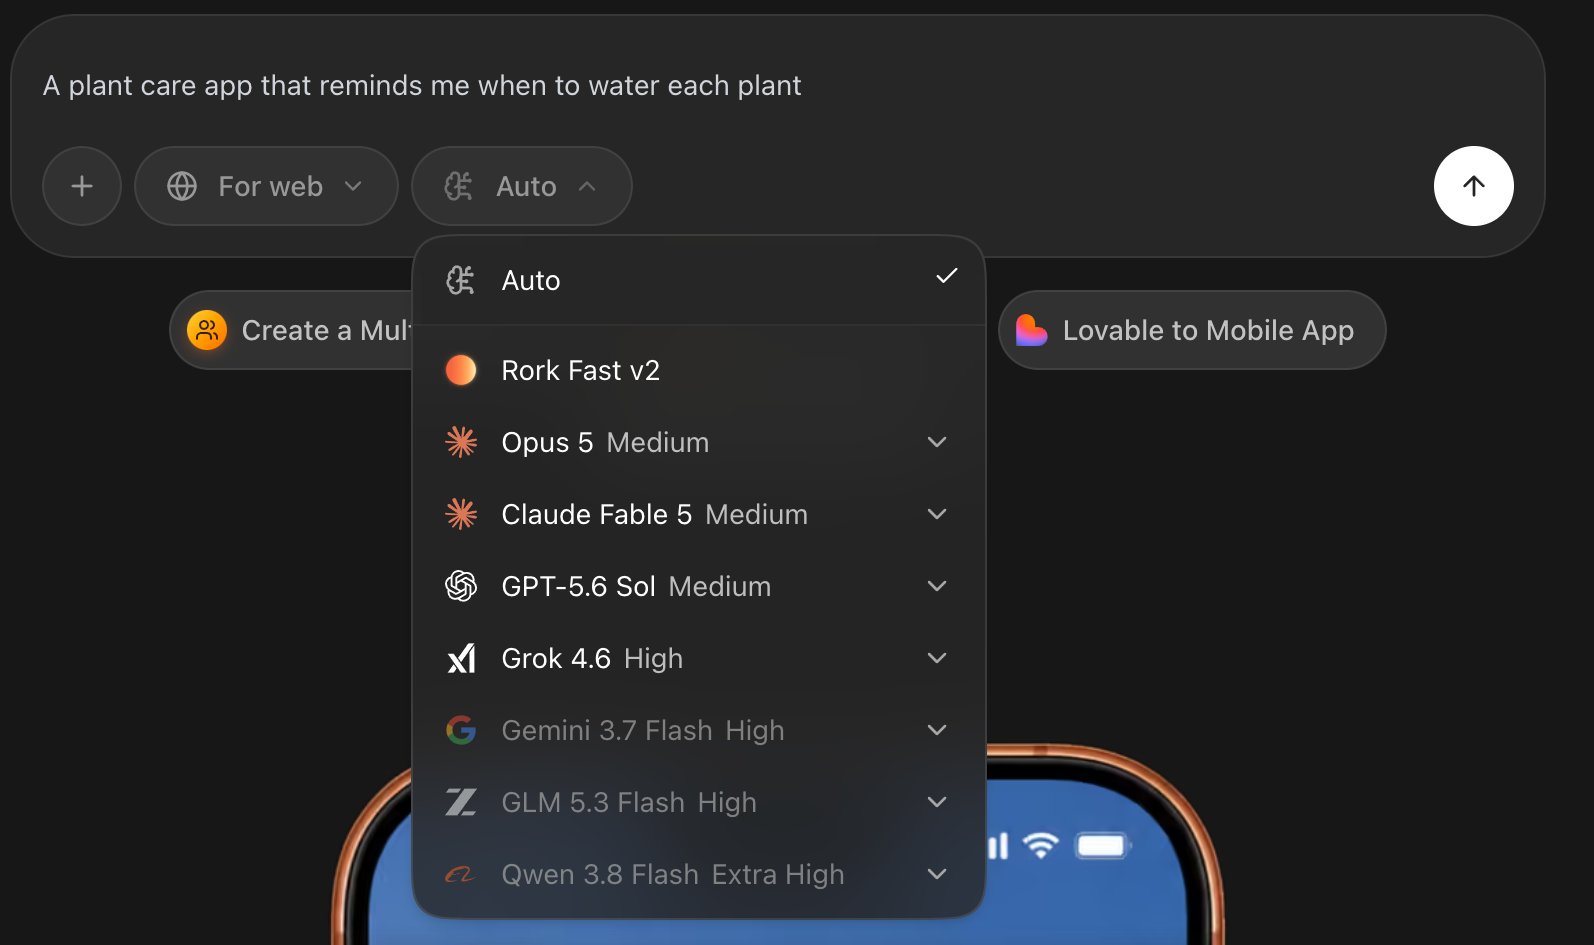
The composer has a model picker. It reads **Auto** by default.

<Frame caption="The model menu. Auto is the default, and models above your plan carry a Pro or Max badge.">
  <img src="https://mintcdn.com/rork/DvKNYT4s6kJH2rkl/images/modes/model-menu.png?fit=max&auto=format&n=DvKNYT4s6kJH2rkl&q=85&s=2e286c0c43eaaf2a9eb3a5b31c2daac5" alt="The Rork model menu open, with Auto selected and a list of named models below it" width="1594" height="945" data-path="images/modes/model-menu.png" />
</Frame>

**Auto** picks the model and the reasoning effort for each message, so most people never open this menu. Pick a model by hand when you want a specific one. Models above your plan carry a **Pro** or **Max** badge, and choosing one opens the plan picker. See the full list in [Plans & Subscriptions](/introduction/subscriptions).

## Talk instead of typing

The microphone button records your voice and writes the text into the composer. Read it, edit it, then send it. Rork does not send a recording straight to the agent, so a wrong word costs you nothing.

## Attach what you already have

Use **+ → Upload image** or drop a file onto the chat. Rork reads screenshots, photos, PDFs, video, audio, and 3D models.

A screenshot is the fastest way to describe a design. Take a picture of a Figma frame, or of an app you like, and say what you want from it.

Free accounts attach files up to **10MB**. Paid plans go up to **5GB**.

## Queue the next message

You do not have to wait for the agent. Send another message while it works and Rork queues it. The queue header counts them, for example **2 Queued**, and each row can be edited or removed before its turn.

If a turn stops or fails, the queue marks itself **· Paused** so nothing runs on top of broken work. Press **Resume** when you are ready.

## FAQ

<AccordionGroup>
  <Accordion title="Does the design step cost credits?">
    Yes, but design credits, not build credits. The free plan includes a monthly allowance for designing. Turning an approved design into a working app needs a paid plan. See [Build credits vs Cloud credits](/billing/build-credits-vs-cloud-credits).
  </Accordion>

  <Accordion title="Can I skip Design mode?">
    Yes. Turn the switch off in the **+** menu, or press **Build** on the first proposal without asking for changes.
  </Accordion>

  <Accordion title="How much did that message cost?">
    Open the **⋯** menu under any answer. It shows the model that ran, the credits it used, and the size of the context. See [Undo a change and go back a version](/features/undo-and-history).
  </Accordion>

  <Accordion title="Rork keeps breaking the same thing. What now?">
    Stop adding messages on top of it. Revert to the last good version, then describe the change more narrowly. See [How to get out of an error loop](/introduction/introduction/agent-loops).
  </Accordion>

  <Accordion title="Where do the plan and design files live?">
    Plans go to `.rork/plans/` and the design contract to `.rork/DESIGN.md`. Both travel with your code to GitHub. See [How to sync your project with GitHub](/tutorials/how-to-connect-github).
  </Accordion>
</AccordionGroup>

## Next steps

<CardGroup cols={2}>
  <Card icon="rotate-left" href="/features/undo-and-history" title="Undo and version history">
    Take back a change, or go back several versions.
  </Card>

  <Card icon="wand-magic-sparkles" href="/features/assets" title="Images, video, and 3D">
    Generate the pictures and sounds your app needs.
  </Card>

  <Card icon="message" href="/introduction/introduction/prompting-strategy" title="How to prompt successfully">
    Ask for an experience, not a list of features.
  </Card>

  <Card icon="users" href="/collaborate/share-a-project" title="Share the project">
    Invite people to view or edit the same app.
  </Card>
</CardGroup>

<CtaBanner />
